How To: Set Up Nextcloud + Syncthing Integration

- Prerequisites
- Step 1: Syncthing Config Folder
- Step 2: Syncthing Data Folder
- Step 3: Choose Syncthing Source
- Step 4: Create Syncthing Systemd Service
- Step 5: Edit Syncthing Config
- Step 6: Verify GUI Access
- Step 7: Setup Peers and Shared Folders
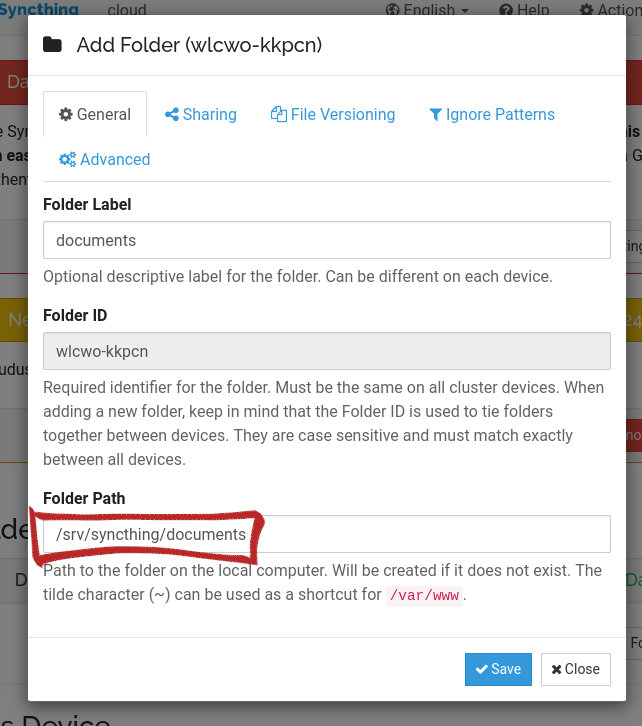
- Step 8: Add Syncthing Folder to Nextcloud
- Step 9: Enjoy Nextcloud and Syncthing Integration
- Conclusion
I previously wrote a post describing the benefits of Nextcloud and of using Nextcloud with Syncthing. Since then, I realized it would be helpful to write an easy to follow, step-by-step guide, describing the process.
The main problem that many on Linux run into is that these two programs typically run as different users. Because of this, you’ll often run into permission issues, and read/write errors when trying to sync Nextcloud data. Below, I explain the process of getting both Nextcloud and Syncthing to play together without these issues.
For this walkthrough, I used Debian 10, however the instructions should work for other Debian based distributions, such as Ubuntu, Raspbian, and RaspberryPi OS. Instructions may vary for other Linux distributions, so make sure you understand each command before entering it.
Prerequisites
- A working Nextcloud installation.
- For this article, my server is named
cloud.
- For this article, my server is named
- Know which user the web server runs as
- In this article, we’re using an Apache web server on Debian 10,
which runs as the
www-datauser.
- In this article, we’re using an Apache web server on Debian 10,
which runs as the
- Another device to sync with
- This device can be another server, personal computer, smartphone, or other such device. It only needs a working Syncthing port.
- For this article, the client computer is a laptop named
clouduser.
Step 1: Syncthing Config Folder
On cloud, create a folder to hold Syncthing configuration files,
and change ownership to the same as the web server.
I’m choosing /opt/syncthing-config
sudo mkdir /opt/syncthing-config
sudo chown www-data:www-data /opt/syncthing-config
Step 2: Syncthing Data Folder
Choose a location for Syncthing data files. These are the files you’ll actually be syncing, so keep in mind the storage space you might need. You may prefer to keep it on a separate partition, or separate disk.
You could set up multiple folders in different locations, but I find it easier to have one Syncthing folder, and then all synced folders to be subdirectories of it.
Regardless of the location you choose, make the sure the web server is the owner.
sudo mkdir /srv/syncthing
sudo chown www-data:www-data /srv/sycnthing
Step 3: Choose Syncthing Source
Check the version on your distro’s package manager. On Debian, the stable package is usually very old, so you’ll need to decide whether to get it from the Debian repos, or from the Syncthing website. From Syncthing, you ensure it’s the most up to date, however from the package manager requires no extra configuration.
From Syncthing Repo
Add the release PGP keys:
sudo curl -s -o /usr/share/keyrings/syncthing-archive-keyring.gpg https://syncthing.net/release-key.gpg
Add the “stable” channel to your APT sources:
echo "deb [signed-by=/usr/share/keyrings/syncthing-archive-keyring.gpg] https://apt.syncthing.net/ syncthing stable" | sudo tee /etc/apt/sources.list.d/syncthing.list
Increase preference of Syncthing’s packages (“pinning”) over system packages.
printf "Package: *\nPin: origin apt.syncthing.net\nPin-Priority: 990\n" | sudo tee /etc/apt/preferences.d/syncthing
Now that the sources have been added to the package manager, continue with From Debian Repo
From Debian Repo
sudo apt update
sudo apt install syncthing
Step 4: Create Syncthing Systemd Service
This will allow us to start Syncthing automatically, as well as make sure it runs with the correct permissions.
Because this file will get overwritten if there is an update to Syncthing, we create a copy of the included service file. After creation, open the new file for editing.
cd /lib/systemd/system
sudo cp syncthing@.service syncthing@www-data.service
sudoedit syncthing@www-data.service
Change the description, home directory, and user.
[Unit]
Description=Syncthing - Nextcloud Compatible for %I

[Service]
User=www-data
ExecStart=/usr/bin/syncthing serve --no-browser --no-restart --home=/opt/syncthing-config --logflags=3 --logfile=/var/log/syncthing.log
Some distributions may require the dash in www-data to be escaped,
and set instead to www\-data.
If you see errors related to this,
try including the backslash.
The home directory is the location we specified for the Syncthing config files
/opt/syncthing-config.
The logging portion is optional,
but may be helpful in case something goes wrong.
Keep everything else as is.
Enable the service, so that it starts automatically.
sudo systemctl enable syncthing@www-data
Now start the service, and check for errors.
sudo systemctl start syncthing@www-data
sudo systemctl status syncthing@www-data `

* Syncthing@www-data.service - Syncthing - Nextcloud Compatible for www/data
    Loaded: loaded (/lib/systemd/system/syncthing@www-data.service; enabled; vendor preset: enabled)
    Active: active (running) since Wed 2021-07-07 11:52:58 UTC; 4s ago
        Docs: man:Syncthing(1)
Main PID: 15925 (Syncthing)
        Tasks: 12 (limit: 9830)
    Memory: 48.4M
If you see errors about the Default folder, you can safely ignore them for now.
Stop the Syncthing service.
sudo systemctl stop syncthing@www-data
The reason we start and stop Syncthing, is just to create the initial Syncthing config files.
Step 5: Edit Syncthing Config
Currently, the GUI is only accessible from the system it is installed on. Since our instance is running on a headless server, we need to make the GUI accessible by the computer we’re working from. To change this, edit the newly created Syncthing config.
sudoedit /opt/syncthing-config/config.xml
The GUI IP is 127.0.0.1:8384,
which means it will only be accessible from localhost.
To make the GUI accessible from any IP,
change the GUI address to 0.0.0.0:8384,
which makes it accessible from any host.
<gui enabled="true" tls="false" debugging="false">
    <address>0.0.0.0:8384</address>
    <apikey>xxxxxxxxxx</apikey>
    <theme>default</theme>
</gui>
Start the service again and once more confirm there are no errors.
sudo systemctl start syncthing@www-data
sudo systemctl status syncthing@www-data
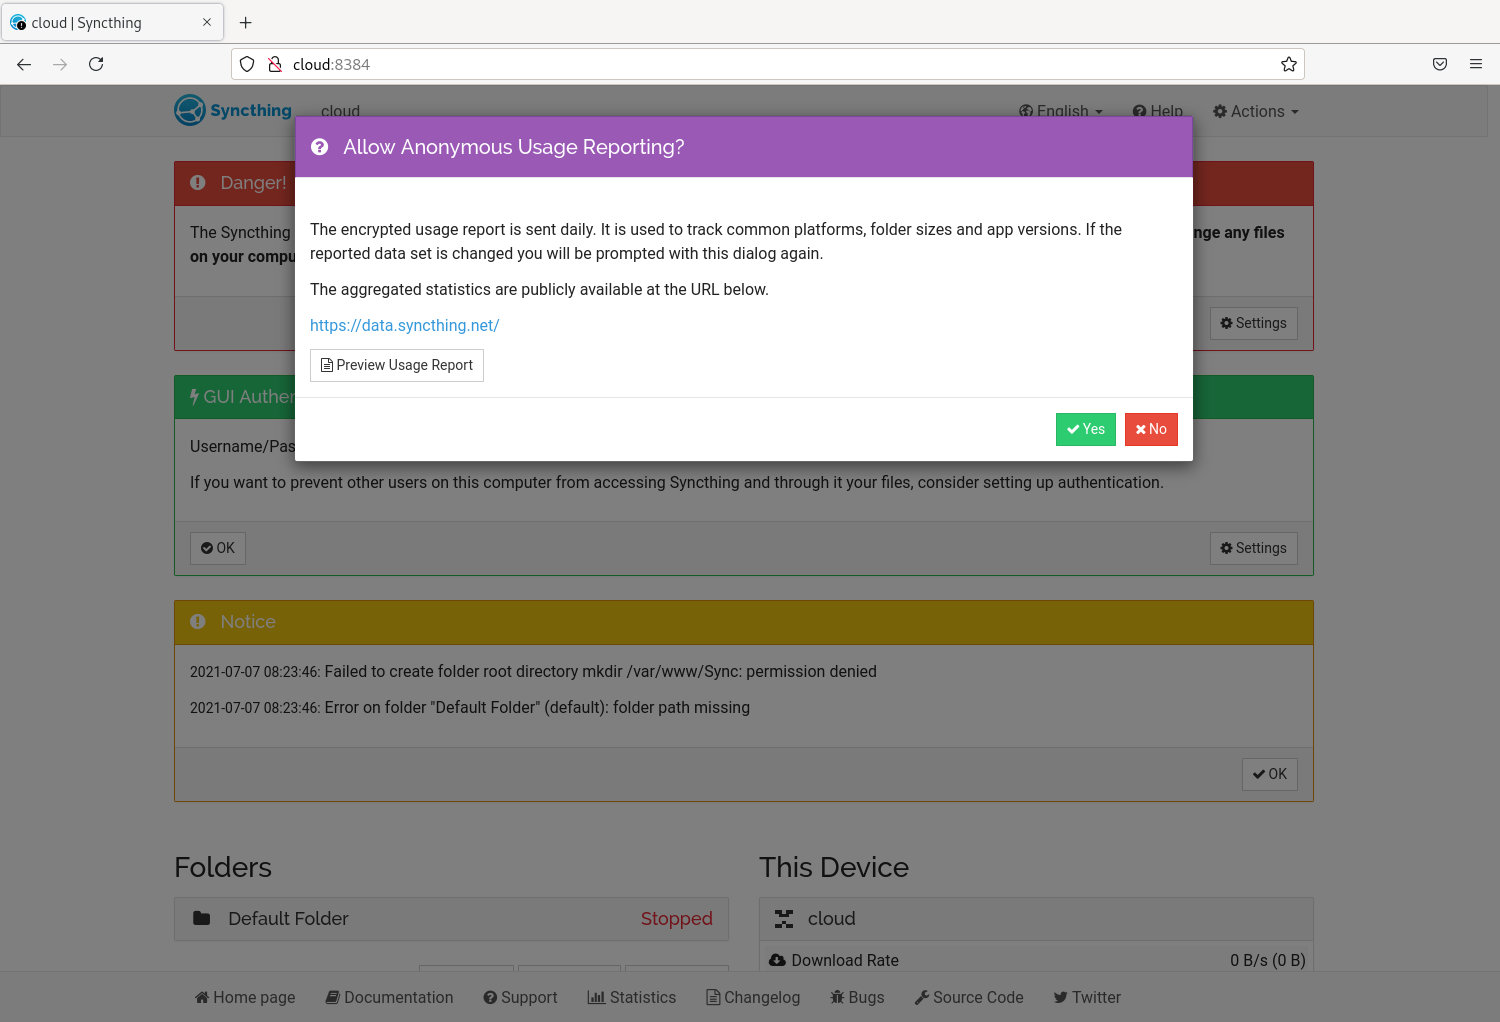
Step 6: Verify GUI Access
The Syncthing GUI should now be accessible via your web browser
using the Nextcloud server’s IP or hostname, and the Syncthing port.
For us it’s http://cloud:8384
Here you’ll see the Syncthing GUI, which should appear like the image below.
Step 7: Setup Peers and Shared Folders
Connect additional clients,
and set up your Syncthing folders as you normally would.
Because syncthing is now running as www-data,
make sure the folder is stored within a www-data owned directory.
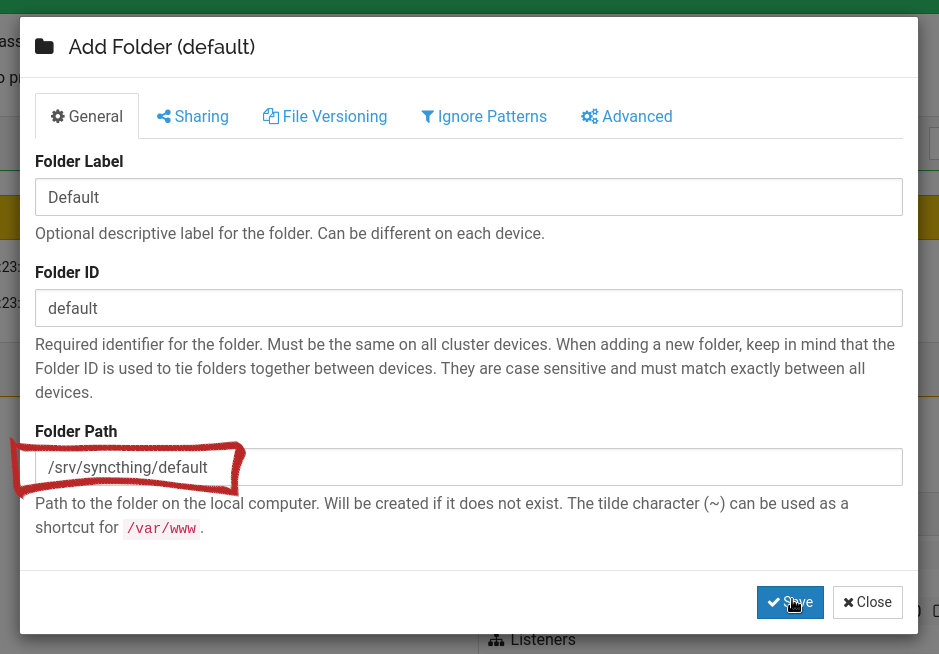
We chose /srv/syncthing in Step 2.
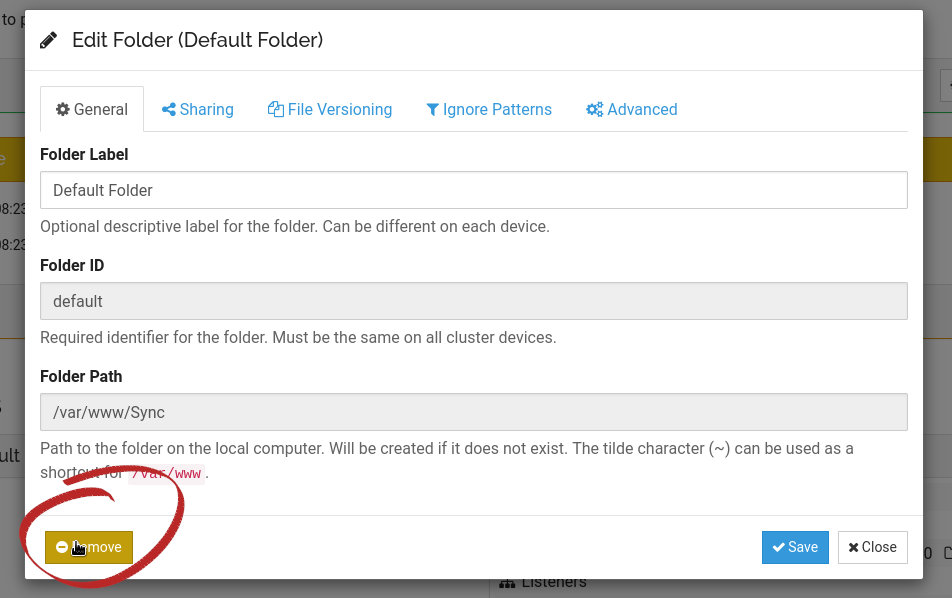
To fix the Default folder error, remove it, and remake the folder under the chosen directory.
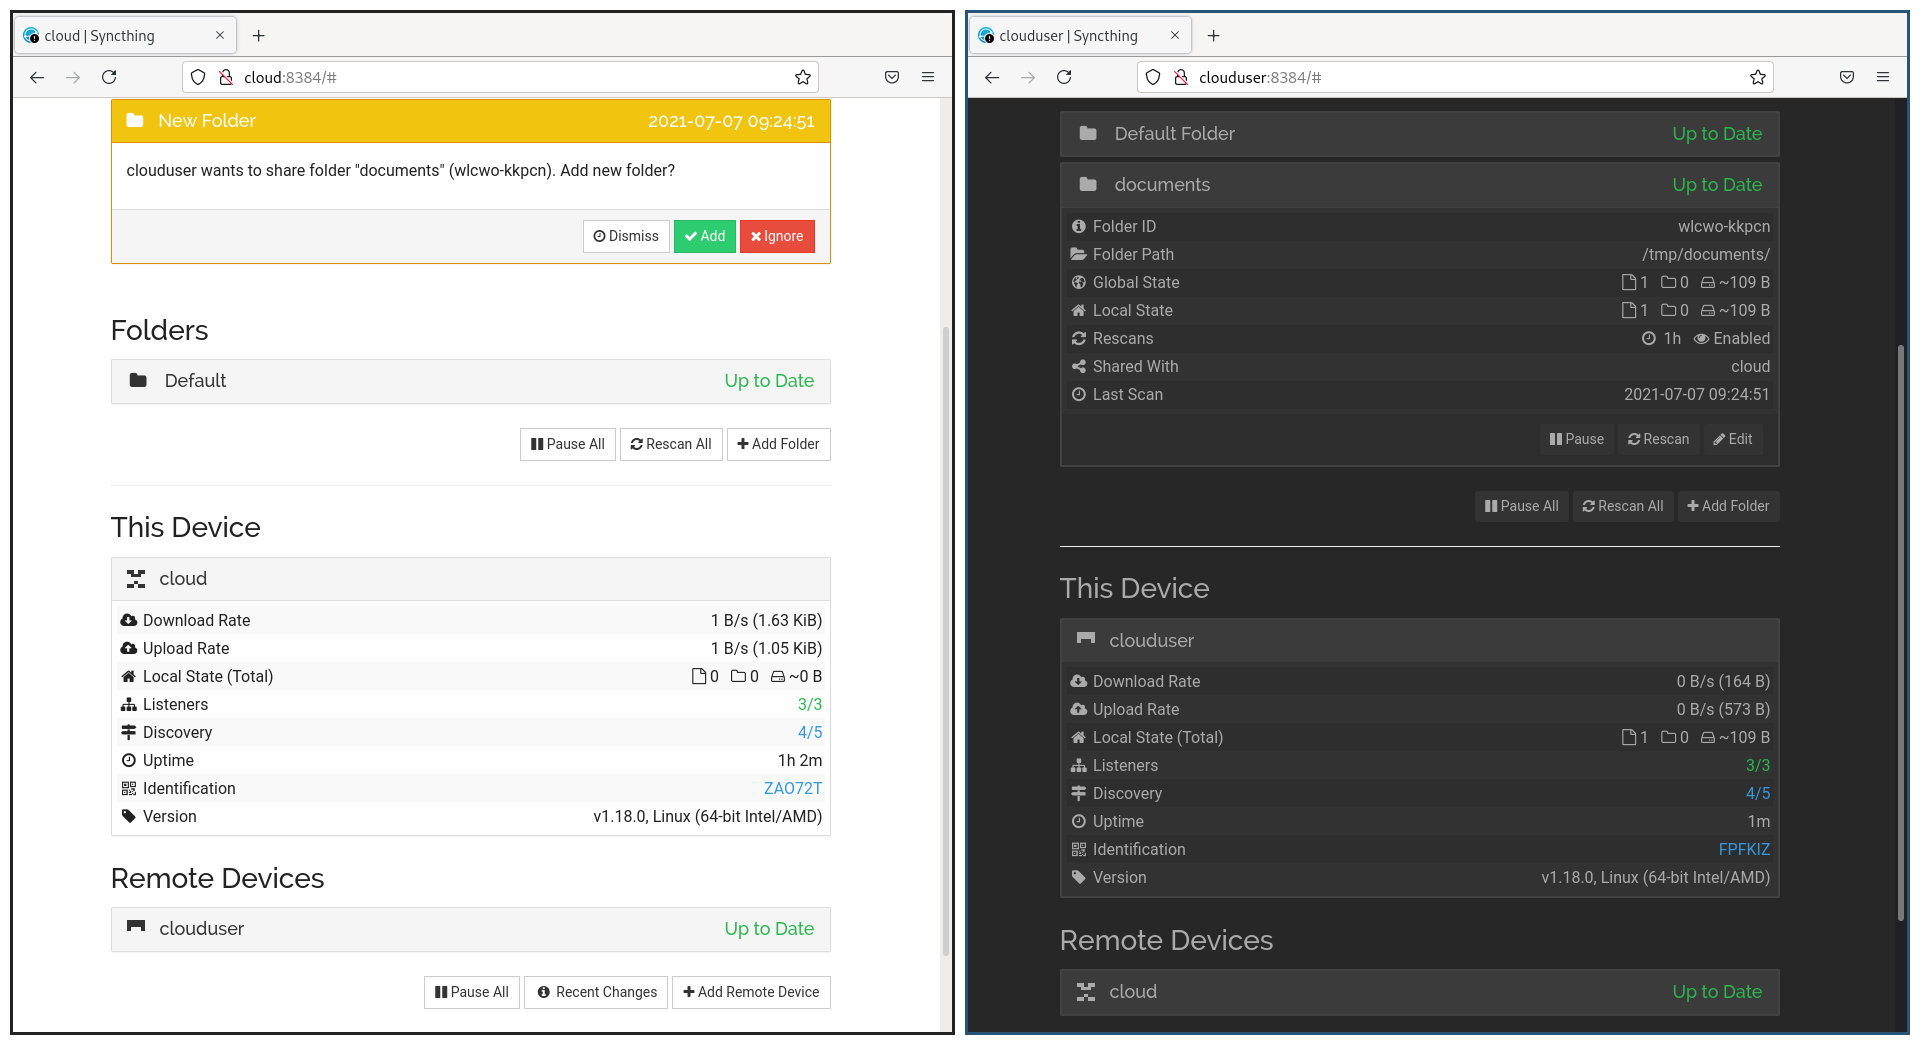
I’ve connected a new client to cloud,
which I’m calling clouduser.
On clouduser I’ve created a new folder,
and inside,
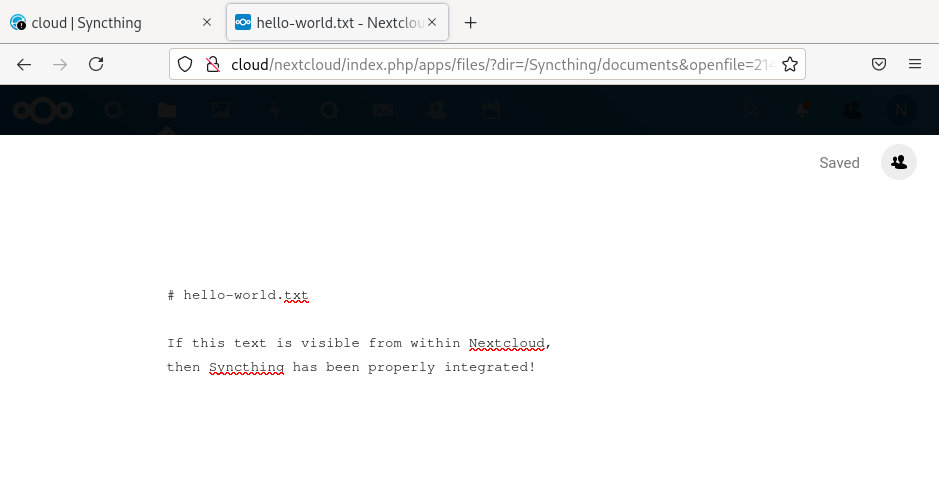
a file called hello-world.txt
# hello-world.txt

If this text is visible from within Nextcloud,
then Syncthing has been properly integrated!
I then shared this folder with cloud.
You can see clouduser GUI on the right,
vs cloud GUI on the left.
When adding new Synced folders to cloud,
make sure the parent directory is owned by www-data,
such as the /srv/syncthing folder we made earlier.
Below,
you can see that cloud
has received the hello-world.txt file from clouduser.

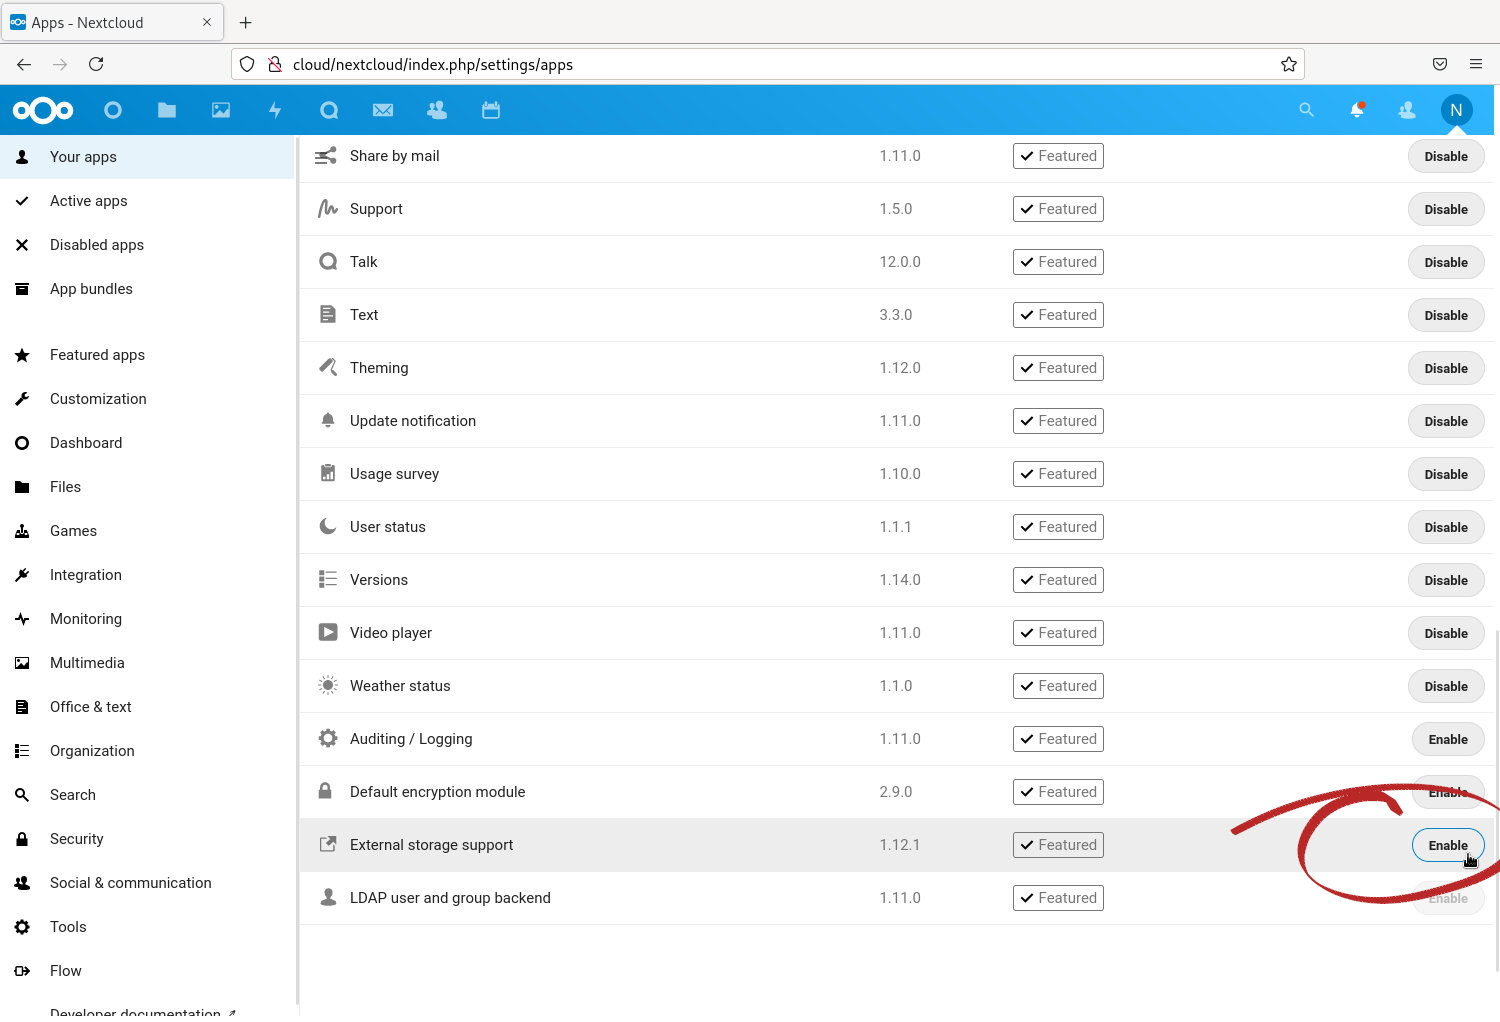
Step 8: Add Syncthing Folder to Nextcloud
Click the Menu icon, and select Apps.
From the Apps menu, enable External storage support.
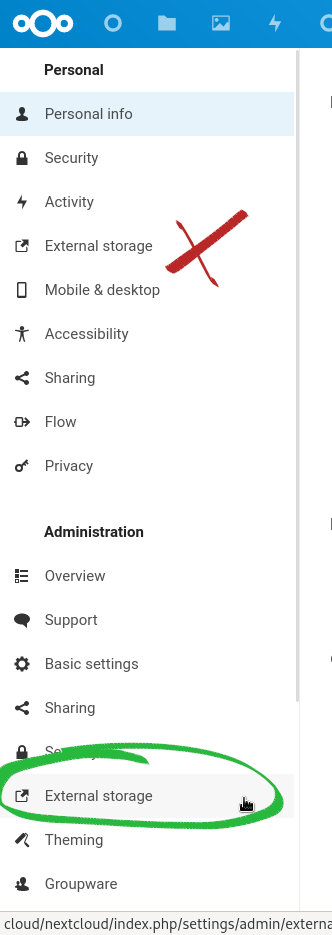
Afterwards, click the Menu icon again,
but this time select Settings.
From the menu on the left,
under the Administration category,
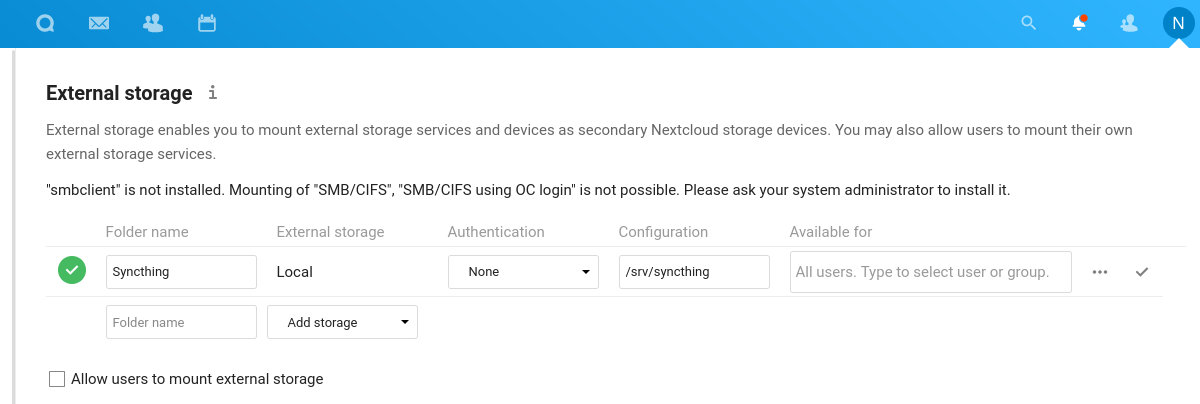
select External storage.
Configure your Syncthing storage location here. The path can be entered as either a relative path, or an absolute path.
Step 9: Enjoy Nextcloud and Syncthing Integration
The final step is to find the synced directory,
and view the file.
From the Nextcloud Files app,
select the Syncthing folder we just created.
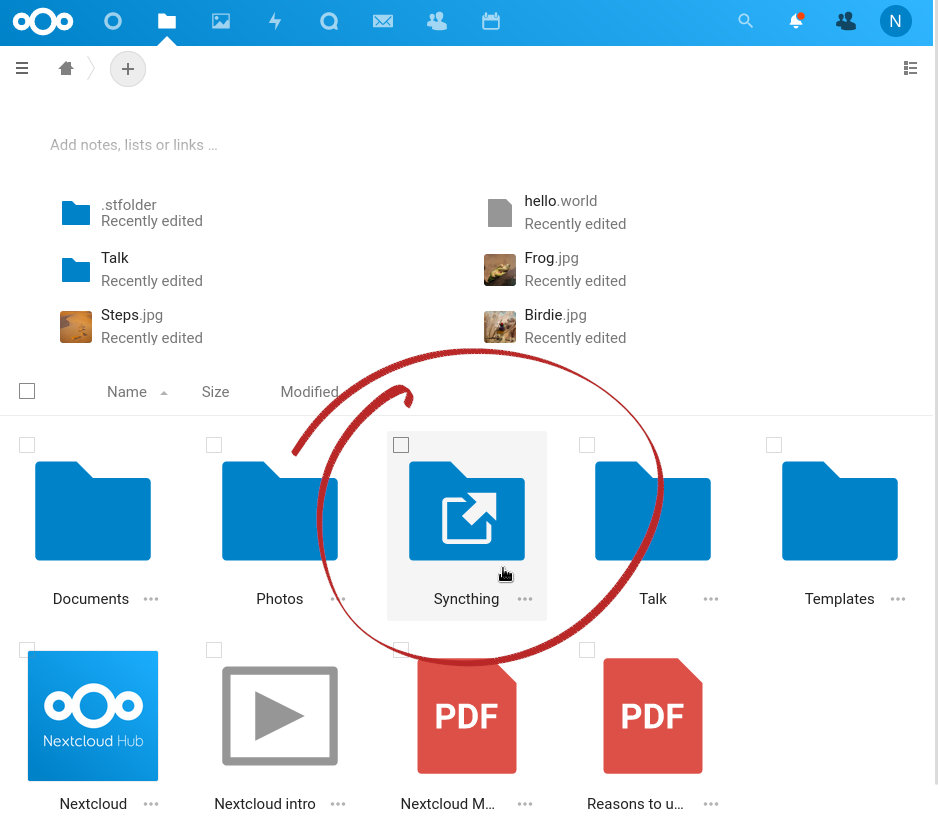
Inside,
you’ll find the documents folder we synced,
as well as the hello-world.txt file.
From now on, any changes to this file will be synced in both directions.
Conclusion
In the end we created a fully synced, and self hosted Google Drive alternative. Any changes made will be synced to all connected devices. This much needed solution helps us take one more step to being completely in control of our own data.